Setup Amazon S3 + CloudFront to Host CPA Affiliate Landing Pages
If you're just wanting to get started with CPA Affiliate Marketing, it may seem overwhelming just to get your first campaigns going on a tight budget due to the number of subscription services you need to sign up for (tracker, spy tool, website hosting, etc.).
This year I want to show people how to get started promoting CPA offers with the cheapest essential services, so you can use the rest of your starting budget to buy traffic and learn affiliate marketing as fast as possible.
After signing up for a free tracker, you're going to want to set up hosting for the landing pages that you will use in your campaign. There are literally hundreds of different hosting providers, which vary by cost, speed, etc.
Today I'm going to show you how to set up CPA affiliate landing pages using Amazon's S3 static website hosting, and CloudFront (Amazon's CDN network) to host lightning fast landers.
Why Amazon S3 + CloudFront?
With hundreds of hosting options available, why is Amazon S3 and CloudFront the best option for hosting your first landing pages?
Amazon's services are extremely cheap, and you only pay for what you use. You can view the pricing for all their services here.
Apart from being really cheap, they offer a FREE pricing tier for one year after you open your account. This can immediately help with your cash flow by allowing you more money each month from your budget to spend on campaigns.
Who doesn't like free?
The other reason Amazon is a good choice for hosting your landing pages is speed. The speed of your landing pages is critical for CPA marketing. If you have slow pages you'll struggle to get a good ROI.
Amazon has data centers around the world, making your landing pages load fast no matter what country your visitors are from.
They load quite fast with just the S3 service, but if we couple it with their CDN network (CloudFront) then they can be as much as 70% faster.
Ready to use Amazon S3 and CloudFront for your website hosting? Let's go!
How To Set Up Amazon S3 + CloudFront
Requirements:
- AWS Account
- Namecheap Account (or another domain registrar account)
- A domain name
In order to follow this guide completely, you are going to want to have an AWS account, a domain, and a Namecheap account. If you don't have a Namecheap account you can still follow the guide, but you will have to figure out the Namecheap steps on your own at your domain registrar.
Step 1: Forward Namecheap Emails
Note: You can skip this step if your namecheap account is with an email you have access to.
Because we are going to make the website secured by SSL (HTTPS), we need to take a few steps in Namecheap before we apply for the free SSL certificate from Amazon.
- Find the domain you'd like to forward emails from. Click 'Manage'.
- On the 'Domain' tab (should be the default tab after step 2), scroll down to the 'Redirect Email' section.
- Click 'ADD CATCH-ALL' and in the 'Forward to' box type your email address.

Step 2: Generate Free SSL Certificate
- Go to the ACM Dashboard and click “Request a Certificate”. Then, pick the public certificate (usually the default option).
- Enter your custom domain name and your domain name prepended with ..(i.e. .example.comand example.com.)
- Select "Email validation".
- Check your email and click on the approval link. Then click “I Approve” on the approval screen you’ll be shown. If you don't get both emails within a minute or 2 you can resend it from your Amazon dashboard.
- If you return to the ACM Dashboard, you should see that your certificate has been issued after a few seconds.
Note: You must wait for your certificate to be "issued" before doing the following steps. If you don't you may run into issues when trying to connect the certificate to CloudFront.

Step 3: Configure S3 Bucket for Static Site
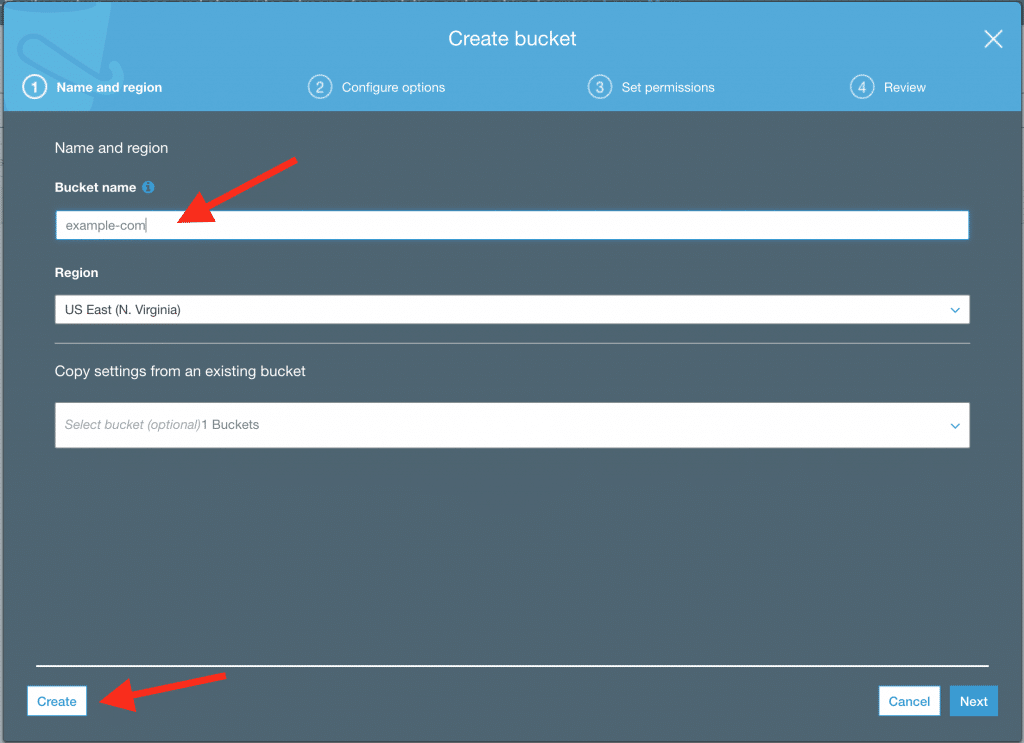
- Go to the S3 Dashboard and click "Create Bucket".
- Enter the name of the bucket. Use the domain name, but DO NOT use a . in the bucket name. Use a - instead.
- It's recommended to use N. Virginia for your server region so your SSL will work correctly.
- Click "Create".
See example below with example.com.
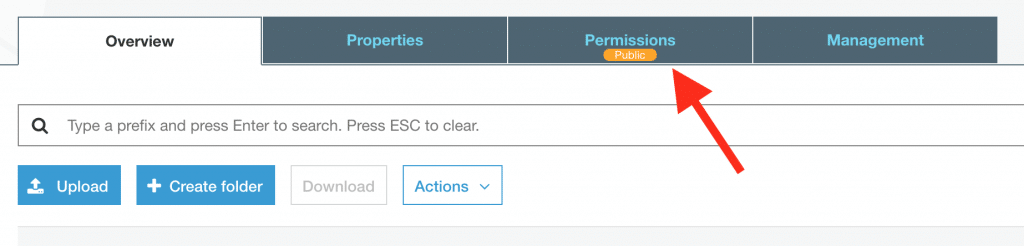
Step 4: Fix Bucket Permissions
- Select the bucket you just created in the S3 dashboard.
- Click on the "Permissions" tab.
3. On the "Public Access Settings" page, click "Edit".
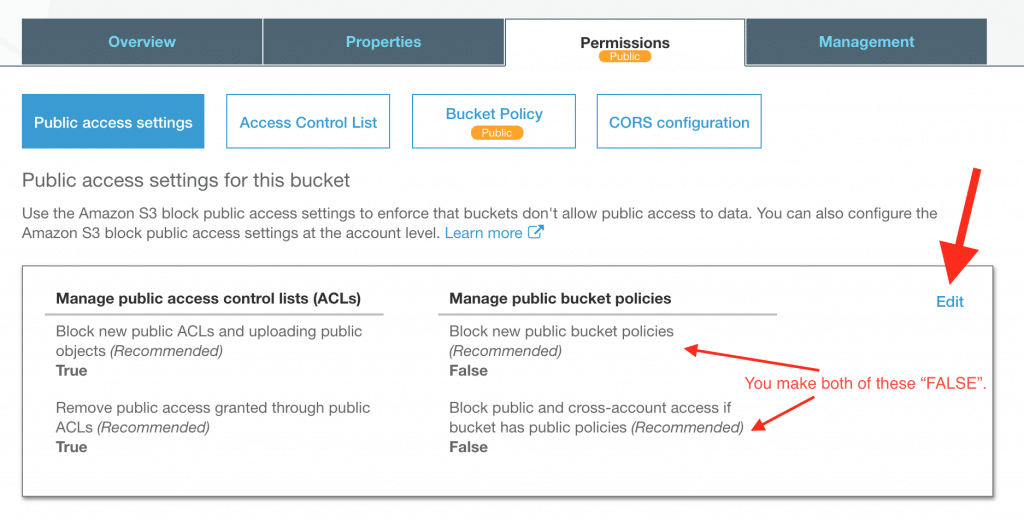
4. Uncheck both boxes under "Manage public bucket polices for this bucket". Click "Save".

5. On the same "Permissions" tab from the previous step(s), navigate to the "Bucket Policy". Paste the code below. Edit the "Resource" key with the name of your bucket (example-com).
{ "Version": "2012-10-17", "Statement": [ { "Sid": "AddPerm", "Effect": "Allow", "Principal": "*", "Action": "s3:GetObject", "Resource": "arn:aws:s3:::example-com/*" } ] }
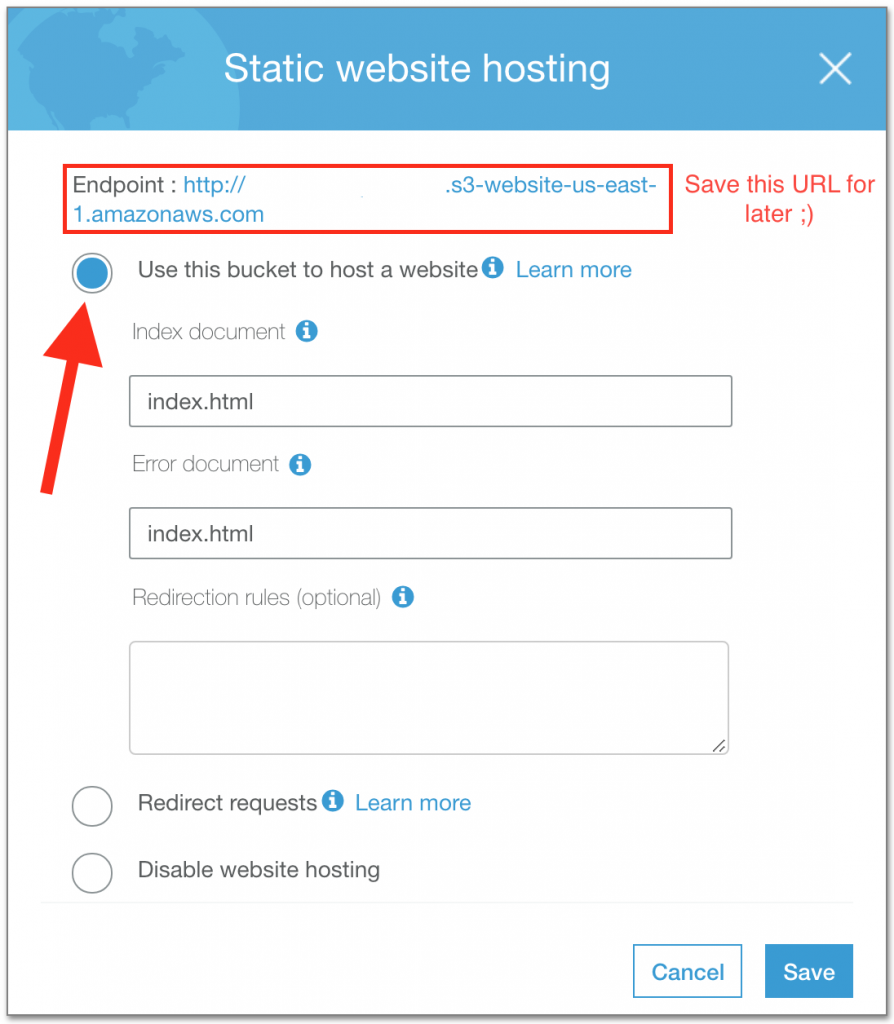
Step 5: Enable Static Website Hosting
- Select the bucket in the S3 dashboard.
- Go to the "Properties" tab.
- Select "Static website hosting". (it will be "Disabled" when you visit this screen)
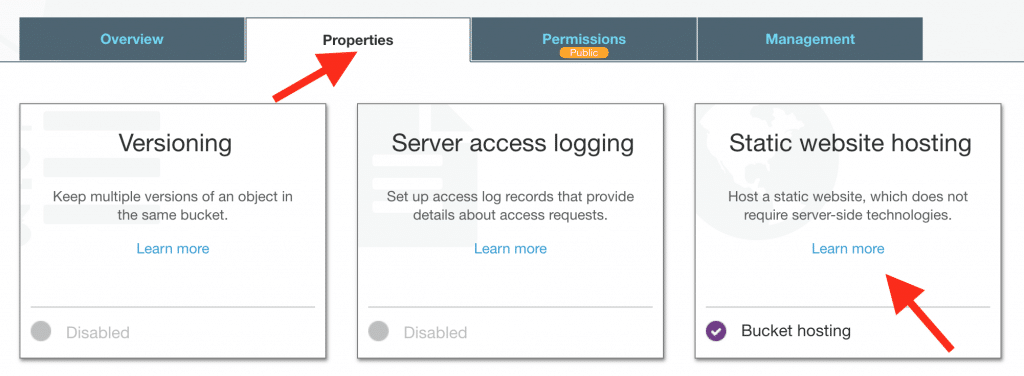
4. Select the radio button "Use this bucket to host a website". In both the index and error document fields, enter index.html. Click "Save". (make note of the "endpoint" on this step.)
Step 6: Enable CloudFront Distribution
- Go to the CloudFront Dashboard and click "Create Distribution".
- Under the "Web" distribution method, click "Get Started".
- In the "Origin Domain Name" box, paste your S3 URL. Don't select the dropdown that may auto populate, as it may cause issues. The "Origin ID" should auto populate.
- In the “Default Cache Behavior Settings,” select Redirect HTTP to HTTPS. Leave the rest of the settings under "Default Cache Behavior Settings" alone except for "Compress Objects Automatically" should be set to "Yes".

5. In the next section titled “Distribution Settings,” you need to enter your custom domain name. Enter both example.comand *.example.com. These should be the same domain names you already requested SSL certificates for.
6. For SSL Certificate type choose "Custom SSL Certificate"; a text box should appear. If for some reason you can't select "Custom SSL Certificate", then you must click the "Request or Import a Certificate with ACM" and request another like we did before. Sometimes your certificate isn't issued from the right region for some reason.
7. Select your SSL Certificate in the text box.
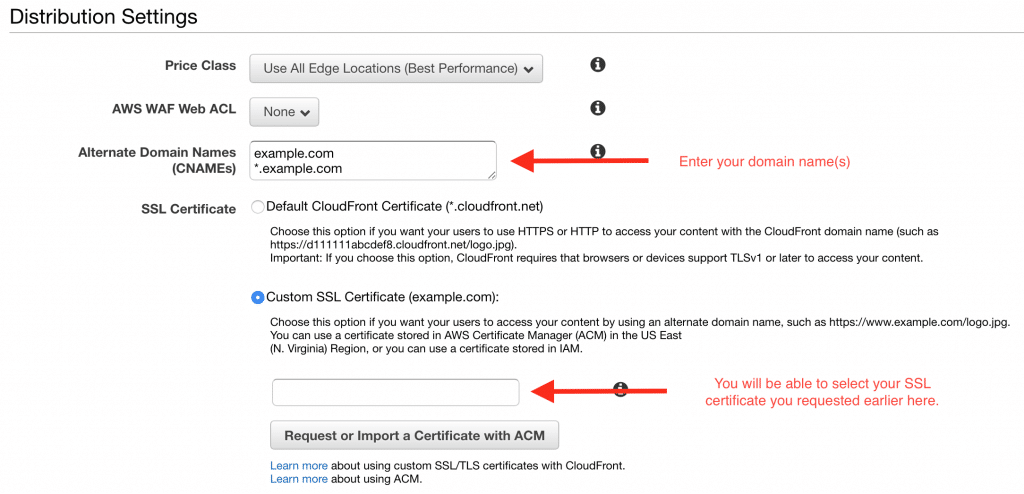
8. Scroll to the bottom of the page and click "Create Distribution".
9. Make note of your "Domain Name" when returned to the CloudFront dashboard.
Step 7: CNAME from Namecheap to CloudFront
- Find the domain you are going to use with CloudFront. Click 'Manage'.
- Go to the "Advanced DNS" tab and find the "Host Records" section.
- Click "Add New Record", select "CNAME". In "Host" type @ and for the "Target" paste your CloudFront URL/Domain Name. (Note: some people have had issues using "@" for the host like I do, so try "www" if it doesn't work.)
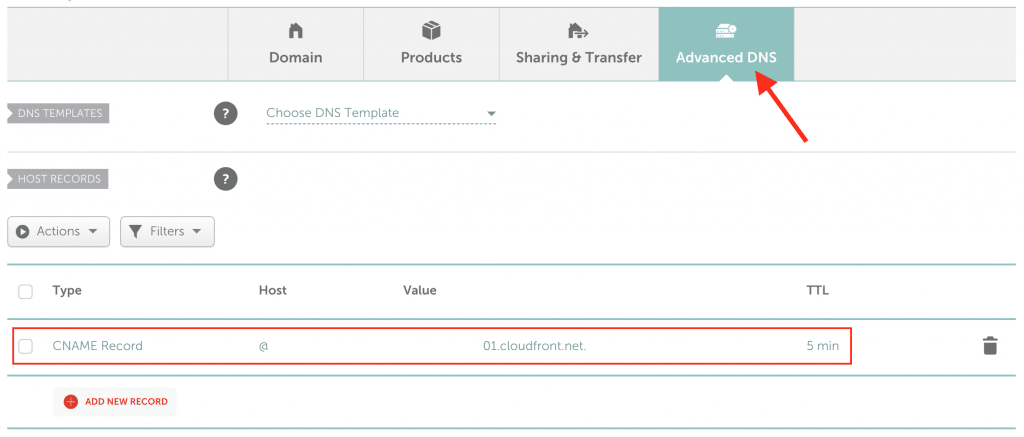
5. Click the green check mark.
6. Wait 60 minutes (probably less).
Step 8: Upload Landing Pages
Now you've created your 'server' and configured it to work with a CDN. You just need to upload your landing pages to your S3 bucket.
If you don't have landing pages to upload, I recommend checking out PureLander landing page builder to quickly make pages for CPA affiliate marketing.
- Go to the S3 dashboard.
- Upload your files. You can use folders to keep everything organized.
- Once you upload a landing page you can view it by typing your domain name followed by the folder structure of you organized it in. For example... example.com/lander1/index.html
That's it. Your can now use landing pages in your CPA affiliate campaigns!